Make Your Own Addon
Here's a blog introduces how to build addon from scratch using redis operator as example, you can read it as an end to end tutorial!
If you want to create an addon using an existing helm chart, you can refer to this section to quickly get started without going through a detailed introduction.
Quick start
We provided the vela CLI tool to help you quickly create an addon structure with examples. Optionally, it can be based on existing Helm Charts or online resources using reference objects.
For instance, to create an addon using version 12.1.6 of the MongoDB helm chart from the repository https://marketplace.azurecr.io/helm/v1/repo, use the following command:
vela addon init mongodb --helm-repo https://marketplace.azurecr.io/helm/v1/repo --chart mongodb --chart-version 12.1.16
Running this command will generate a basic addon directory in your local path:
$ ls mongodb
NOTES.cue     README.md     definitions   metadata.yaml parameter.cue resources     schemas       template.cue  views
You can still use this CLI tool to create an addon from a helm chart stored in an OCI registry. Here's an example:
vela addon init podinfo --helmrepo oci://ghcr.io/stefanprodan/charts --chart podinfo --chart-version 6.1.*
You can also base your addon on Kubernetes objects from remote URLs. For example, you can directly include multiple CRDs in this way:
vela addon init my-addon --url https://domain.com/crd1.yaml --url https://domain.com/crd2.yaml
The commands we introduced above can also be used together, e.g., you can base your addon on both Helm Charts and reference objects.
Basic Concept
A KubeVela addon is a collection that can contain the following three types of files;
Basic information filethat containsmetadata.yamlandREADME.md.OAM module filethat defines KubeVela extensibility points, including Definitions, UI-Schema or topology-rules.Application description filethat defines a KubeVela application. Typically, aDefinitionof addon should be supported by a Kubernetes operator. The Kubernetes objects of this operator should be defined in a KubeVela application. After the addon is enabled, these resources will be dispatched to the clusters by KubeVela application controller.
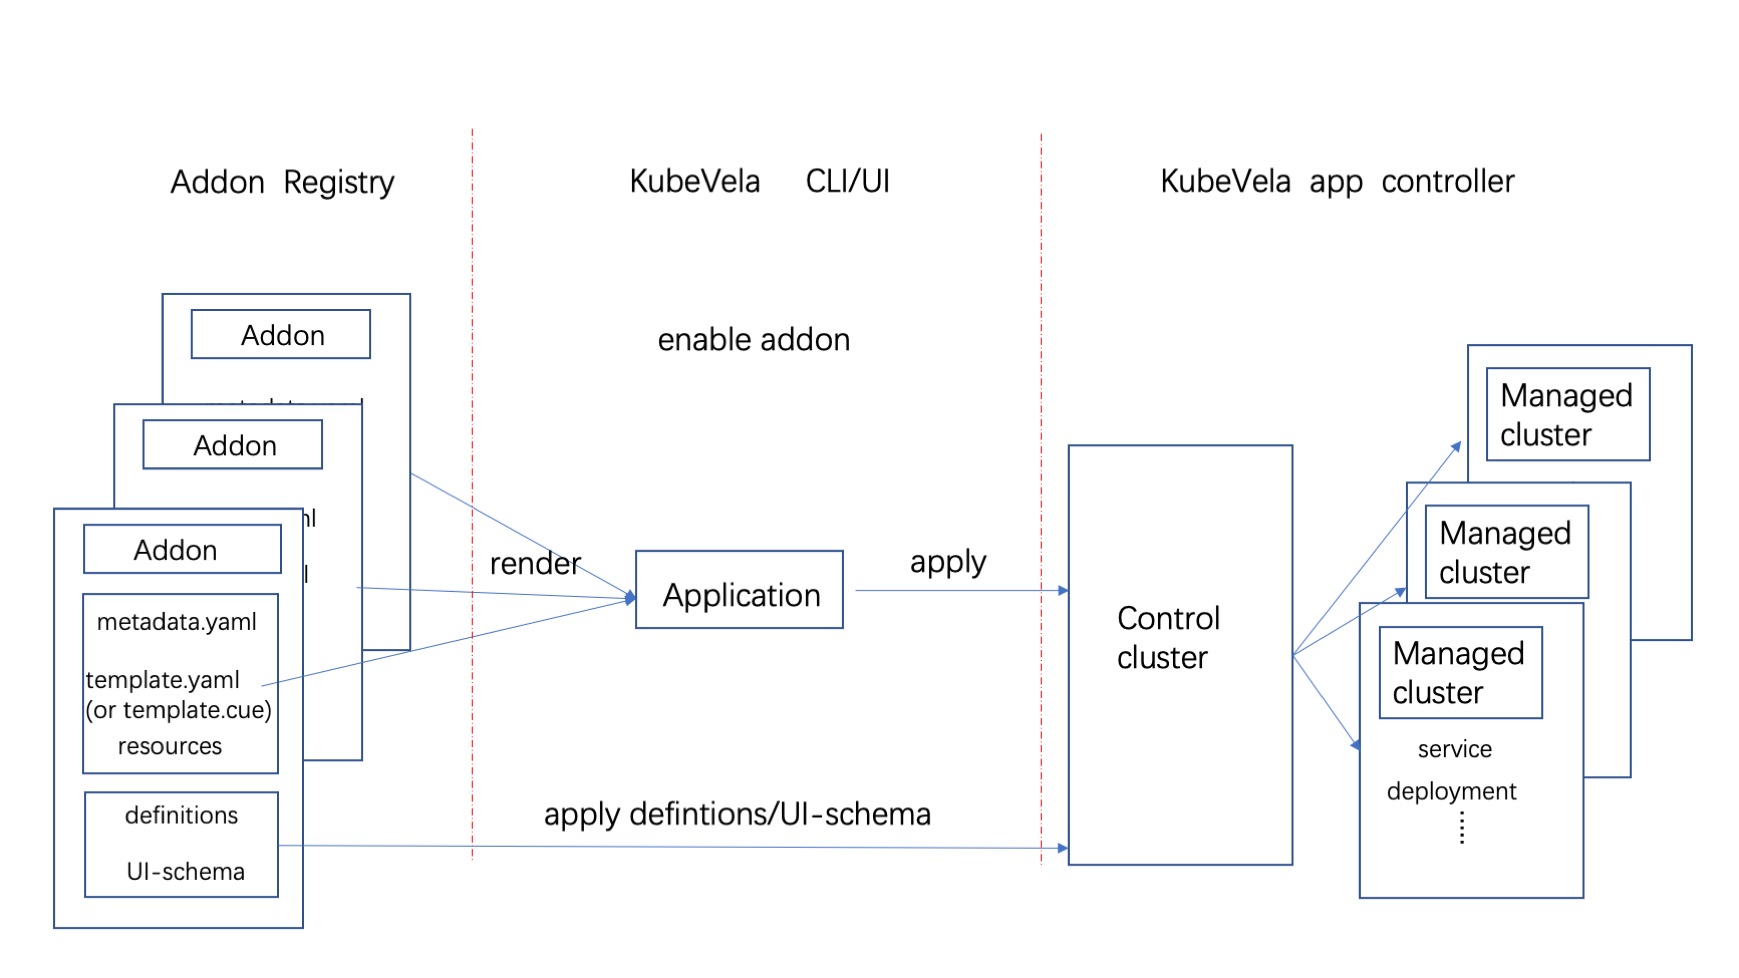
The picture below shows what KubeVela does when an addon is enabled. There are mainly three process:
- Addon Registry store addons which can be used to share and distribute addons anywhere, it can be any git repo or helm chart repository.
- When an addon is enabled through UX/CLI, it will pull these resource files from the Addon Registry, assemble them into a KubeVela application and apply it.
- Finally, the KubeVela controller take care the rest things and deliver the addon as a normal application to the clusters.
To make an addon, you should follow some basic rules. You need to create an addon directory to place addon resource files.
Typically, the directory hierarchy is as follows:
├── resources/
│   ├── xxx.cue
│   └── xxx.yaml
├── definitions/
├── schemas/
├── config-templates/
│   ├── xxx.cue
├── views/
│   ├── xxx.cue
├── README.md
├── metadata.yaml
├── parameter.cue
└── template.yaml(or template.cue)
You can use vela addon init <addon-name> command to create a basic structure of addon.
Not all of these directories or files are necessary, let's explain them one by one.
Basic information file
This type of file is required in an addon.
metadata.yaml
A metadata.yaml describes the basic information of an addon, such as the name, version, description, etc. With this file, an addon can be recognized by UX/CLI, an example is as follows:
name: example
version: 1.0.0
description: Example addon.
icon: xxx
url: xxx

tags:
  - only_example

deployTo:
  runtimeCluster: false

dependencies:
- name: addon_name
  version: ">= 1.0.0, < 2.0.0"

system:
  vela: ">=v1.4.0"
  kubernetes: ">=1.19.0-0"

invisible: false
Here's the usage of every field:
| Field | Required | Type | Usage |
|---|---|---|---|
| name | yes | string | The name of the addon. |
| version | yes | string | The version of addon, increase for every change and follow SemVer rule. |
| description | yes | string | Description of the addon. |
| icon | no | string | Icon of the addon, will display in addon dashboard. |
| url | no | string | The official website of the project behind the addon. |
| tags | no | []string | The tags to display and organize the addon. |
| dependencies[] | no | array of objects | Addons which this addon depends upon. KubeVela will make sure these dependencies are enabled before installing this addon. |
| dependencies[].name | yes | string | Name of the addon dependency. |
| dependencies[].version | no | string | Required version constraints for the dependency. You can specify a range like ">= 1.0.0, < 2.0.0". KubeVela will select the latest version matching the constraints. If no constraint is given, KubeVela will select the latest version. |
| system.vela | no | string | Required version of vela controller, vela CLI will block the installation if vela controller can't match the requirements. |
| system.kubernetes | no | string | Required version of Kubernetes, vela CLI will block the installation if Kubernetes cluster can't match the requirements. |
| deployTo.runtimeCluster | no | bool | By default, the addon will not be installed in the managed clusters. If it's true, it will be delivered to all managed clusters automatically. (This field only take effect when application template file is YAML typed) |
README.md (Required)
The README will be displayed in the dashboard for end user who's going to install this addon. So you should let them understand the basic knowledge of the addon which contains:
- What is the addon?
- Why to use this addon? The use case and scenarios.
- How to use this addon? It is the
end userwho should understand. An end to end demo is recommended. - What will be installed? The definitions along with the CRD controllers behind.
There is no restrict rules for an experimental addon, but if the addon want to be verified, the README is the most important thing.
OAM module file
This type of file is optional in an addon.
Definition files (definitions/ folder)
The definitions/ folder is used to store Definition, which can be a YAML file of ComponentDefinition, TraitDefinitions or WorkflowStepDefinitions Kubernetes CustomResource. It can also be a CUE file that defines KubeVela Definitions, which will be rendered into the corresponding Kubernetes objects and applied to the cluster when enabling the addon.
These definitions will only be applied to the control plane.
UI-Schema (schemas/ folder)
The schemas/ folder is used to store the UI schema files corresponding to Definition, which is used to enhance the display effect when displaying the parameters required by Definition in UX.
Application description file
This type of file is optional in an addon.
Through the above introduction, we know that the Definition of an addon usually should be supported by a Kubernetes operator. The operator should be defined in a KubeVela application and installed by KubeVela application controller. So the function of application description file is describing this application. Application description file contains two types of file: application template file (template.yaml or template.cue) and resources files which under resources/ folder.
The content of a YAML typed file must be a Kubernetes object manifest, so you can use the simplest way to define a KubeVela application that may contain several components, policies, or workflow. If you choose to use CUE to define application description files the addon will have these abilities:
- Utilize the flexible and concise syntax of the CUE language, rich built-in functions and its parameter verification capabilities, to render and deploy the application and auxiliary resources with parameters and metadata of addon.
- An addon may contain multiple Definitions and CRD Operators, they can be selectively installed according to parameters of addon.
YAML application description file will introduce how to use YAML define application of addon. CUE application description file will introduce how to use CUE define the application of addon.
The above is a complete introduction to how to make an addon, you can find the complete description of the above-mentioned addon in catalog.
Other description file
Views (views/ folder)
The views/ folder is used to store the VelaQL View files.
Config Templates (config-templates/ folder)
The views/ folder is used to store the Config Template files.
Install Addon Locally
You can install the addon from local to debug your own addon:
vela addon enable ./your-addon-dir/
Known Limits
- Cannot only install addon in the sub-clusters. Because of KubeVela need render out every kind of resource in control plane, if an addon contain some CRD, and these CRDs must be installed in control plane, otherwise Vela-core controller will meet an error of cannot find CRD.
Extend Terraform Addon
- We have built some tools to extend cloud resource as addons for convenience, you can refer to the extend terraform addon docs.
Contribution
Besides uploading the addon resource files to your addon repository, you can also submit a pull request to KubeVela community addon repository and experimental addon repository to contribute your addons to the community. Once your pull request is merged, other KubeVela users will be able to discover and utilize your addons.
Please abide by the following rules when making a contribution:
-
A new addon should be accepted as experimental one first with the following necessary information:
- An accessible icon url and source url defined in addon's
metadata.yaml. - A detail introduction include a basic example about how to use and what's the benefit of this addon in
README.md. - It's more likely to be accepted if useful examples are provided in example dir.
- An accessible icon url and source url defined in addon's
-
An experimental addon must meet these conditions to be promoted as a verified one.
- This addon must be tested by addon's e2e-test to guarantee this addon can be enabled successfully.
- Provide an introduction in KubeVela official addon documentation.
-
If you come across with any addon problems, feel free to raise a github issue or just send pull requests to fix them. Please make sure to update the addon version in your pull request.