An Introduction to KubeVela Addons: Extend Your Own Platform Capability

As we all know, KubeVela is a highly extensible platform, on which users can build their own customizations using Definitions. KubeVela addons are a convenient way to pack all these customizations and their dependencies together as a bundle, to extend your own platform capabilities!
This blog introduces the main concepts of an addon and guides you to quickly start building one. Finally, we'll show you the experience of the end user, and how the capabilities provided are glued in a consistent user-friendly experience.
Why use addons
We typically use addons with addon catalog, which is a registry contains addons that including all kinds of customizations that the KubeVela community carefully crafted. You can download and install these addons with just one click. For example, you can provide the ability to deploy Helm Chart in your KubeVela Application to your cluster by installing fluxcd addon.
Contrary to the convenience of one-key installation, without KubeVela addons, you have to manually install FluxCD in this way:
- Install FluxCD using Helm Charts or downloaded yaml manifests
- Glue FluxCD CRD with your system manually, it can be done by adding Component or Trait Definitions in KubeVela
Actually, this is how we install FluxCD before KubeVela v1.1. Although it seems like only 2 steps needed, we found it to be quite troublesome:
- Complicated installation: users are required to refer to documentations to manually install FluxCD and tackle possible errors
- Scattered resources: users need to obtain different resource files from different places
- Hard distribution: users having to download manifests manually makes it hard to distribute all these resources in a uniformed way
- Lack multi-cluster support: KubeVela emphasizes multi-cluster delivery a lot. However, manual installation makes multi-cluster support hard to carry out.
- No version management: users need to manage the relationship between definitions, controllers, and corresponding versions by themselves.
KubeVela addons are born to solve these problems.
How KubeVela addons work
KubeVela addons mainly contain two parts:
- One is the installation of the capability provider, which is usually a CRD Operator. The installation process are intrinsically leveraging KubeVela Application to work.
- Another one is the glue layer, which is OAM Definitions and other extensions. These OAM Definitions usually depend on the capability provider and provide user-friendly abstraction from best practices.
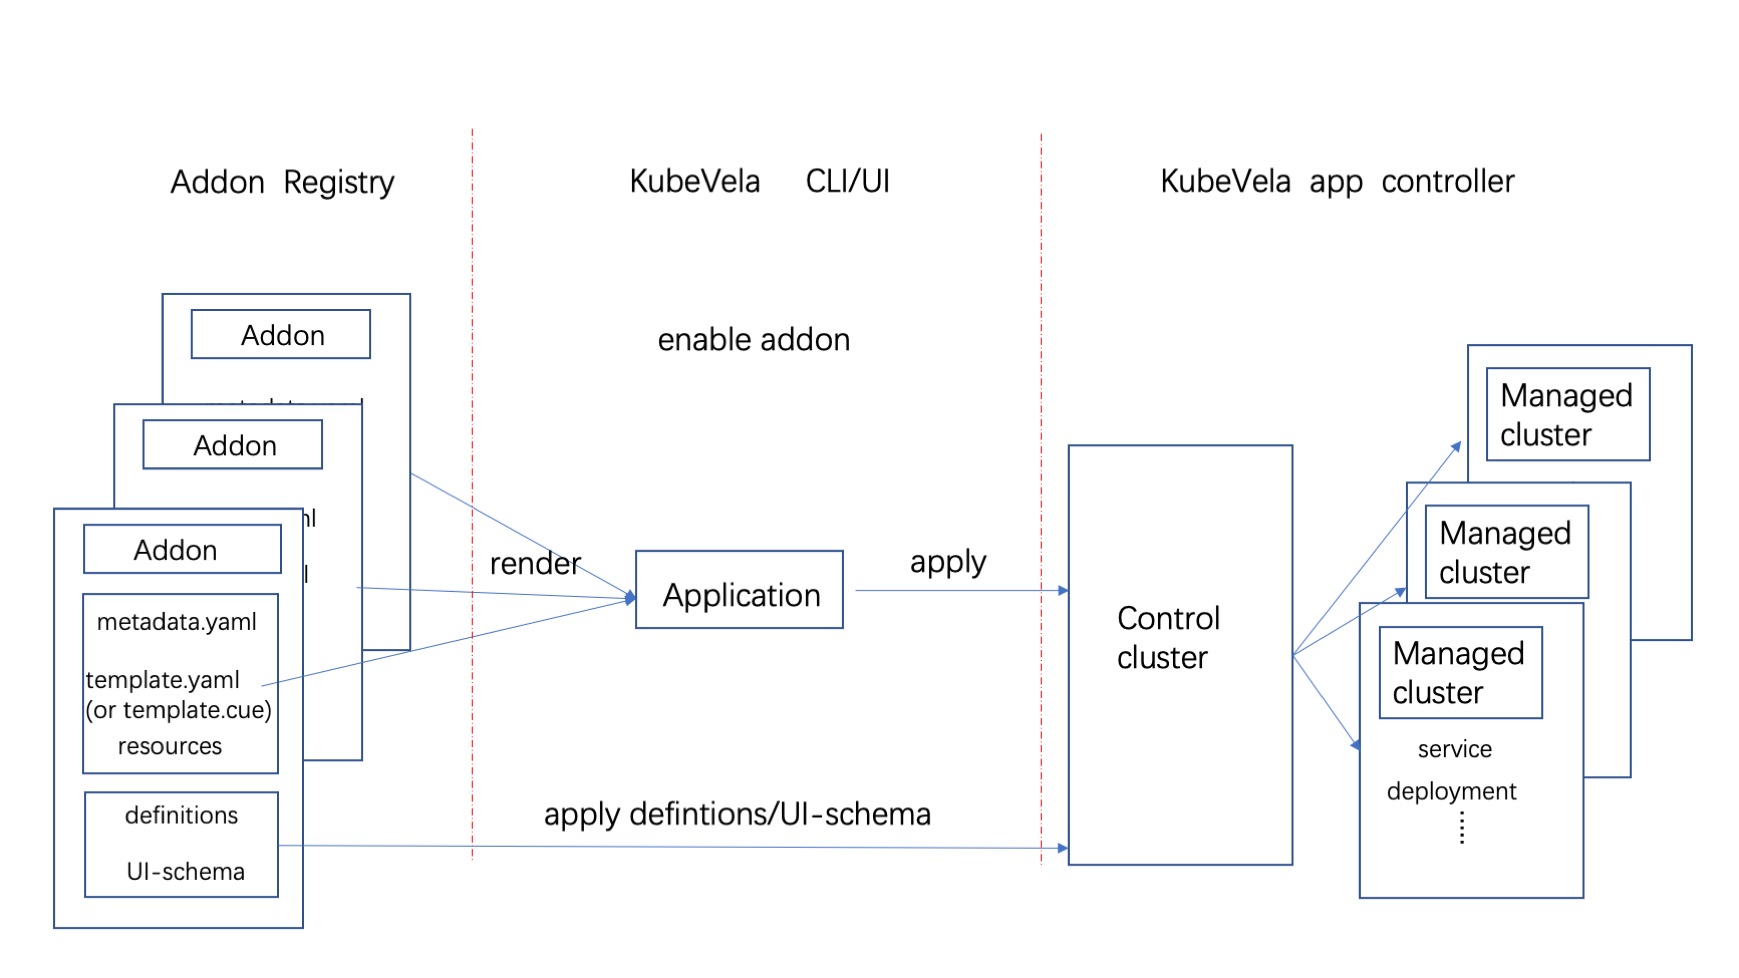
The whole working mechanism of addon is shown as above. KubeVela Application has the multi-clusters capability that help deliver CRD operators of addon into these clusters. The definition files are only used by KubeVela control plane, so they will only existing in the control plane clusters.
Once installed, an application object will be created and all related resources will mark ownerReference to this application. When we want to uninstall an addon, we just need to delete the application, the ownerReference mechanism of Kubernetes will help clean up all the other resources.
Let's build a Redis addon as example, which makes it possible to use Redis Components in Applications, to create a Redis cluster. Such addon will at least include a Redis Operator (to create Redis clusters) and a ComponentDefinition (to define what is a redis Component).
The installation process of an addon includes installing Applications (which includes a Redis Operator), Definitions and etc.
Create your own addon
Make sure you're using KubeVela v1.5+ to have all these capabilities mentioned below.
We will guide you through the whole process of making an redis addon. The full source code of this guide is located at catalog/redis-operator.
As an introduction, we won't cover all features. If you are interested to build addon by your own, you'd better refer to the "Make Your Own Addon" documentation for details.
First, we need to consider what our addon can provide to end users. Let's say our Redis addon can provide a Component called redis-failover, which will create a whole Redis cluster when declared in application.
Then we will figure out how to achieve this. To define a redis-failover Component, we need to write a ComponentDefinition. To be able to create a Redis Cluster, we use a Redis Operator as the capability provider.
Now our goals are clear:
- Write an OAM Application, which includes the installation of a Redis Operator. (Refer to
template.cueandresources/in the full source code.) - Write a ComponentDefinition, which defines Components called
redis-failover. (Refer todefinitions/folder in the full source code.)
But before we start coding, we need to understand the structure of an addon directory. We will describe each file later, just have a basic understanding of what files are needed for now.
The command vela addon init can help you create the scaffold addon directories and files as an initialization.
redis-operator/
├── definitions
│   └── redis-failover.cue
├── resources
│   ├── crd.yaml
│   ├── redis-operator.cue
│   └── topology.cue       # (Optional)
├── metadata.yaml
├── parameter.cue
├── README.md
└── template.cue
Let's explain all these files and folders one by one:
redis-operator/is the directory name, which is the same as the addon name.definitions/folder stores Definitions, including TraitDefinition, ComponentDefinition, and etc.redis-failover.cuedefines the ComponentDefinition that how theredis-failovercomponent can be used, and how it integrates with the underlying resources.resources/folder contain resource files which will be composed as a whole application intemplate.cue.crd.yamlinside theresources/folder is the CRD that comes with Redis Operator. Yaml file inside this folder will be applied to Kubernetes directly.redis-operator.cuedefines a web-service Component, which installs the Redis Operator.topology.cueis optional, it helps KubeVela build the relationships between Application and the underlying resources.metadata.yamldefines metadata of this addon, including name, version, tags, maintainers and etc. This information can be an overview of addon exposed to any registry.parameter.cuedefines the parameters of this addon, end users can use them to customize their addon installation.README.mdguides the user to quickly start using this addon.template.cueis the template of the addon which will form the whole Application when installed.
Now let's go through the deep of how to write them one by one.
We will use CUE language extensively in the following section, so CUE Basic might be useful.
parameter.cue
parameter: {
	//+usage=Redis Operator image.
	image: *"quay.io/spotahome/redis-operator:v1.1.0" | string
	// ...omitted
The parameters defined in parameter.cue are customizable by users when installing addons, just like Helm Values. You can access the values of these parameters in CUE later by parameter.<parameter-name>. In our example, image is provided to let the user customize Redis Operator image and can be accessed in redis-operator.cue by parameter.image.
Apart from customizing some fields, you can also do something creative, such as parameterized installation of addons. For example, fluxcd addon have a parameter called onlyHelmComponents. Since fluxcd addon is a big one, which includes 5 different controllers, not all users want such a heavy installation. So if the onlyHelmComponents parameter is set to true by the user, only 2 controllers will be installed, making it a relatively light installation. If you are interested in how this is achieved, you can refer to fluxcd addon for details.
When you design what parameters are provided to the user, you can follow our best practices to make it user friendly.
- Do not provide every possible parameter to your user and let them figure out how to dial dozens of knobs by themselves. Abstract fine-grained knobs into some broad parameters, so that the user can input a few parameters and get a usable but customized addon.
- Decide on sane defaults for starters. Let the user get started with your addon even if they don't provide parameters (if possible).
- Provide usage for each parameter, you can mark annotation above the parameter as the example does.
- Keep parameters consistent across versions to avoid incompatibilities during upgrades.
template.cue and resources/ folder
OAM Application is stored here, which contains the actual installation process of addons. In our case, we will create an Application that includes a Redis Operator to give our cluster the ability to create Redis clusters.
template.cue and resources/ directory both serve the same purpose -- to define an Application. Aside from historical reasons, the reason why we split it into two places is readability. When we have a ton of resource in template.cue, it will eventually be too long to read. So we typically put the Application scaffold in template.cue, and Application Components in resources directory.
template.cue
template.cue defines the framework of one Application. Most of the contents here can be boilerplates, they're explained as annotations in the code block.
// package name should be the same as the CUE files in resources directory,
// so that we can refer to the files in resources/.
package main

output: {
	// This is just a plain OAM Application
	apiVersion: "core.oam.dev/v1beta1"
	kind:       "Application"
	// No metadata required
	spec: {
		components: [
			// Create a component that includes a Redis Operator
			redisOperator // defined in resources/redis-operator.cue
		]
		policies: [
		// What namespace to install, whether install to sub-clusters
		// Again, these are boilerplates. No need to remember them. Just refer to the full source code.
		// https://github.com/kubevela/catalog/blob/master/experimental/addons/redis-operator/template.cue
		// Documentation: https://kubevela.io/docs/end-user/policies/references
		]
	}
}
// Resource topology, which can help KubeVela glue resources together.
// We will discuss this in detail later.
// Documentation: https://kubevela.io/docs/reference/topology-rule
outputs: topology: resourceTopology // defined in resources/topology.cue
The output field is the keyword of this template, it contains the Application that will be deployed. In side the application, the spec.components field will reference the objects defined in the resources/ folder.
The outputs field is another keyword that can be used to define any auxiliary resources you want to be deployed along with this addon. These resources MUST follow Kubernetes API.
resources/ folder
Here we define Application Components that will be referred to in template.cue. We will use a webservice Component to install Redis Operator. Of course, if you are comfortable with extra dependencies (FluxCD addon), you can use helm Components to install the Redis Operator Helm Chart directly. But one of the principles of writing an addon is to reduce external dependencies, so we use the webservice Component, which is a built-in Component of KubeVela, instead of helm.
// resources/redis-operator.cue

// package name is the same as the one in template.cue. So we can use `redisOperator` below in template.cue
package main

redisOperator: {
	// an OAM Application Component, which will create a Redis Operator
	// https://kubevela.io/docs/end-user/components/references
	name: "redis-operator"
	type: "webservice"
	properties: {
		// Redis Operator container image (parameter.image is defined in parameter.cue)
		image:           parameter.image
		imagePullPolicy: "IfNotPresent"
	}
	traits: [
		// ...omitted
	]
}
You can refer to the annotation inside the code block to learn the detail usage for every field.
Highlights of the glue capability provided by KubeVela
One of the notable features is Topology Rules (or Resource Topologies, Resource Relationships). Although not required, it can help KubeVela build the topological relationships of the resources managed by a KubeVela Application. This is how KubeVela can glue all kinds of resources together into an Application. It is especially helpful when we use Kubernetes Custom Resource(CR) (which is exactly the case in this example).
// resources/topology.cue

package main

import "encoding/json"

resourceTopology: {
	apiVersion: "v1"
	kind:       "ConfigMap"
	metadata: {
		name:      "redis-operator-topology"
		namespace: "vela-system"
		labels: {
			"rules.oam.dev/resources":       "true"
			"rules.oam.dev/resource-format": "json"
		}
	}
	data: rules: json.Marshal([{
		parentResourceType: {
			group: "databases.spotahome.com"
			kind:  "RedisFailover"
		}
		// RedisFailover CR manages the three resource below
		childrenResourceType: [
			{
				apiVersion: "apps/v1"
				kind:  "StatefulSet"
			},
			// Topologies of Deployment and etc. are built-in.
			// So we don't need to go deeper to Pods.
			{
				apiVersion: "apps/v1"
				kind:  "Deployment"
			},
			{
				apiVersion: "v1"
				kind:  "Service"
			},
		]
	}])
}
In our case, the redis-failover Component will create a CR, named RedisFailover. If we don't have Topology Rules, although we know RedisFailover is managing several Deployments and Services, KubeVela doesn't magically know this. So we can tell KubeVela our understanding with Topology Rules. Once KubeVela know what's inside a RedisFailover, it will know the relationships of all the resources inside an Application.
This can bring huge benefits and give us a consistent experience for all extended resources:
- Resource topology graphs from application to underlying pods can be provided in VelaUX
- Consistent execute commands into pods for all kinds of Application components using
vela exec - Consistent forward ports to pods for all kinds of Application components using
vela port-forward - Consistent get logs from pods for all kinds of Application components using
vela log - Consistent get Pods or access endpoints for all kinds of Application components using
vela status --pod/--endpoint
You can refer to run our addon to see the real user experience.
definitions/ folder
Definitions folder contains KubeVela Definitions, including ComponentDefinitions, TraitDefinitions, and etc. This is the most important part of an addon as it provides the real capability to end users. With the Component and Trait types defined here, users can use them in their applications.
Writing Definitions for an addon is the same as writing regular OAM Definitions, this is a huge topic so we won't go to deep in our addon introduction, you can refer to following docs to learn how to write each kinds of definitions.
In our redis addon example, we should refer to Component Definition and Redis Operator to write our ComponentDefinition. We'll name this component type as redis-failover. It will create a CR called RedisFailover. With RedisFailover created, the Redis Operator in our addon Application will create a Redis cluster for us.
You can refer to the source code here.
metadata.yaml
Just the name implies, these are all metadata of an addon, including addon name, version, system requirements, and etc. You can refer to this documentation for the detail list. The example listed below contains all the fields available.
There're some legacy supports, while we are focusing on the new addon format introduced in KubeVela v1.5+. For example, the old deployTo.runtimeCluster should be deprecated and using topology policy define in application as its alternative. You can refer to template.cue in the full source code.
# addon name, the same as our directory name
name: redis-operator
# addon description
description: Redis Operator creates/configures/manages high availability redis with sentinel automatic failover atop Kubernetes.
# tags to show in VelaUX
tags:
  - redis
# addon version
version: 0.0.1
# addon icon
icon: https://xxx.com
# the webpage of this addon
url: https://github.com/spotahome/redis-operator
# other addon dependencies, e.g. fluxcd
dependencies: []

# system version requirements
system:
  vela: ">=v1.5.0"
  kubernetes: ">=1.19"
Run our addon
Now we have finished most of our work. It is time to run it! If there's any details that were skipped, you can download the full source code to complete them.
After we finish all the redis-operator addon, we can use command vela addon enable redis-operator/ to enable it locally. It can help us debug and write docs about the end user experience.
As to say our example addon, you can refer to the README to learn how should be introduced.
The README.md is very important as it guides users to start using an unfamiliar addon.
By using this addon, users only need to write 4 lines of yaml to get a Redis cluster with 3 nodes! Contrary to manually installing Redis Operator, even manually managing Redis instances, the use of an addon greatly improves user experience.
apiVersion: core.oam.dev/v1beta1
kind: Application
metadata:
  name: redis-operator-sample
spec:
  components:
    # This component is provided by redis-operator addon.
    # In this example, 2 redis instance and 2 sentinel instance
    # will be created.
    - type: redis-failover
      name: ha-redis
      properties:
        # You can increase/decrease this later to add/remove instances.
        replicas: 3
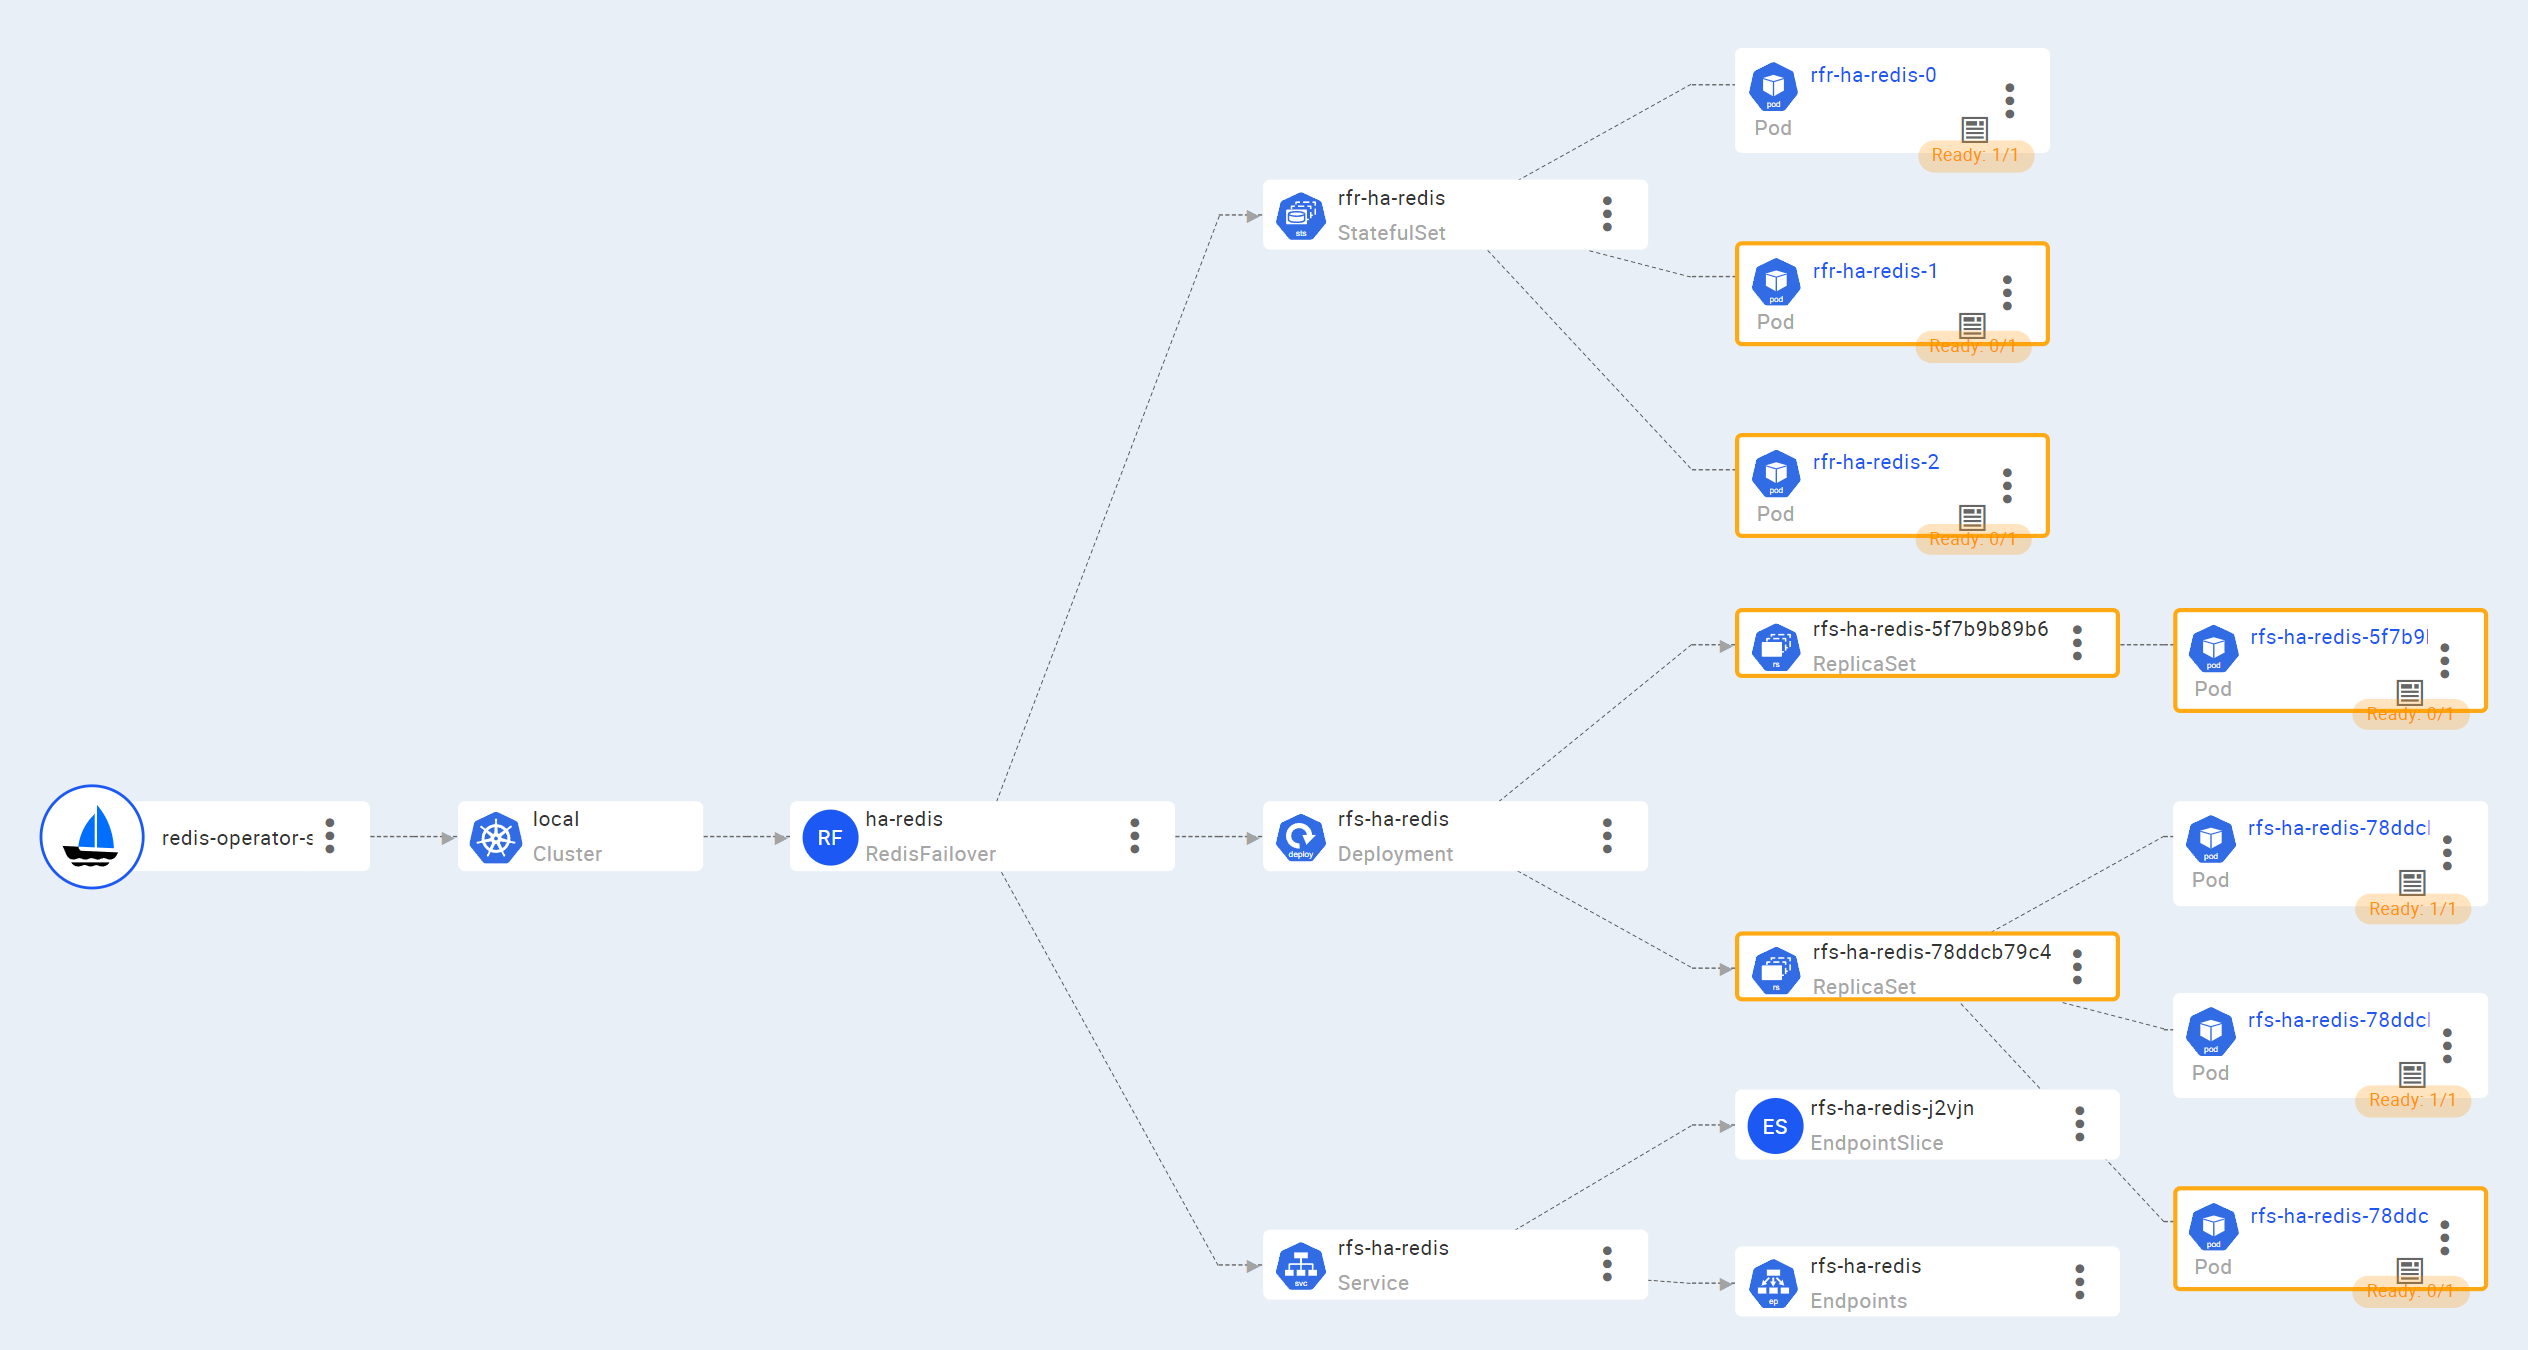
A whole tree of complicated resources are created with just a few lines of yaml, as shown in the figure below. Since we have written Topology Rules for our addon, users can easily see the topology of all the resources (Pods, Services) of a Redis Cluster. They are now not limited to the level of observability of KubeVela Applications, instead, they can have a glance on the statuses of low-level resource. For example, we can see certain Redis Pods are still not ready in our figure:
Users can also choose the low-level resources of our sample Application, i.e., 3 Redis Pods and 3 Sentinal Pods, when executing vela exec/log/port-forward.
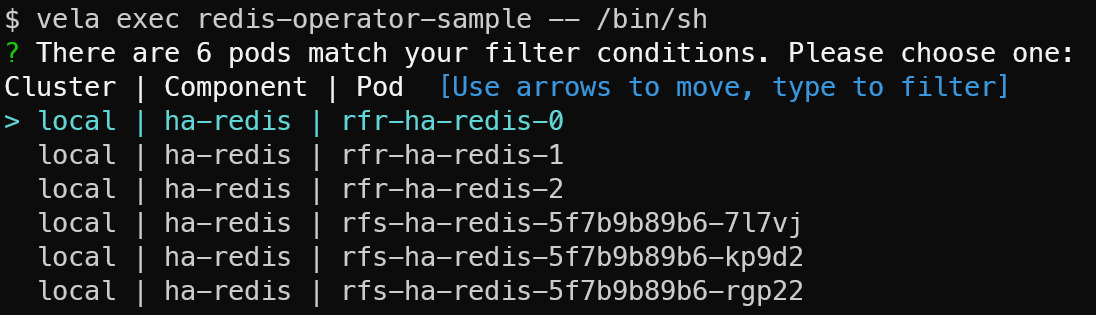
At the first glance, it may not seem that useful to exec into a Pod if you are running a single cluster. However, if you are running multi-cluster installations, having the option to choose resource spanning across multiple clusters is a huge time-saver.
vela status can get the status of an Application. With Topology Rules, we can take one step further -- find out endpoints in an Application directly. In our example, users can get endpoints of Redis Sentinel to connect to by:

Wrap up
By the end of this guide, you probably already have a good grasp of what addons do and how to make addons. As a conclusion, you'll get the following benefits:
- Extend platform capability into a bundle that can be easy to use and share with the whole community.
- Orchestrate and template all the infrastructure resources into multi-clusters in a flexible way powered by KubeVela application and CUE.
- Provide consistent experience for end users with all kinds of extended capabilities.
At last, if you have successfully built your own addon, you're extremely welcomed to contribute it to the addon catalog. As a result, everyone in the KubeVela community can discover and benefit from extending your powerful platform capabilities!